
How to Do a Transmission Oil Change on Suzuki, Mitsubishi Mirage, Nissan Juke and Nissan Pulsar
How to change and correctly level check JF015E CVT fluid on Suzuki, Mitsubishi Mirage, Nissan Juke and Nissan Pulsar. Covers overflow tube method, temperature-based level setting, correct CVT fluid spec, and common mistakes to avoid.

February 12, 2026

Table of contents
Introduction
If you drive a Suzuki, Mitsubishi Mirage, Nissan Juke or Nissan Pulsar with a Jatco JF015E CVT, keeping the CVT fluid clean and at the correct level is one of the best ways to protect the transmission. In NZ conditions, lots of short trips, stop-start driving, hills and summer heat can put extra load on CVT fluid, so correct servicing matters.
Safety disclaimer
This guide is general information only and does not replace the manufacturer’s service manual for your exact vehicle, year, and VIN. CVT fluid level setting on the JF015E is temperature sensitive and can be damaged by incorrect fluid type, incorrect level, contamination, or unsafe lifting practices. If you do not have the correct tools (especially a scan tool to read CVT fluid temperature) or you are not confident working under a safely supported vehicle, have the service completed by a qualified workshop. Always dispose of used oil and fluids through an approved recycling programme in New Zealand.
Aisin is a major Japanese transmission manufacturer supplying a range of CVT units used across multiple brands and markets. Many of these CVTs are designed with no dipstick and use a sealed fill, overflow, or standpipe system where the level is set by procedure rather than by sight. This is why “topping up” without the correct method is risky.
Many small capacity vehicles, including certain Suzuki, Mitsubishi Mirage, Nissan Juke and Nissan Pulsar models, are fitted with Jatco CVT units from the JF015E family (often referenced as CVT7 / RE0F11A style). These transmissions rely on the correct CVT fluid type and a precise level setting procedure.
Unlike a conventional automatic, CVTs are very sensitive to oil condition and oil level. Low or incorrect fluid can cause pressure loss, belt slip, overheating and accelerated internal wear.
CVT fluid type: NS-2 vs NS-3
Different Nissan CVT applications use different fluid specifications, most commonly Nissan NS-2 or Nissan NS-3, depending on the model, transmission type, and year.
Service and installation guides list both NS-2 and NS-3 across various Nissan models, including the Nissan Juke, often separated by production year or transmission code. This is why fluid selection must always be confirmed by VIN or the official Nissan service manual before filling.
Important update:
Nissan NS-2 has been superseded by Nissan NS-3. NS-3 is the latest genuine Nissan CVT fluid.
In many cases, NS-3 is backward compatible with applications that originally specified NS-2. However, compatibility depends on the exact transmission and model year. Always confirm the correct specification before servicing, as using the wrong CVT fluid can cause shudder, slip, overheating, or internal damage.
How to Check and Set the CVT Fluid Level (Correct JF015E Method)
Most JF015E applications do not have a traditional dipstick for accurate level setting. The correct method is a controlled level set using:
- Engine running (idling)
- Vehicle level
- CVT fluid temperature in a specified window
- Checking for fluid flow from the overflow tube
The correct temperature window
ATSG specifies confirming CVT fluid temperature in the 35°C to 45°C range for level confirmation.
Step by step: level check and adjustment
- Start the engine.
- With your foot on the brake, move the shifter through all positions (P through the full range and back to P), holding each position briefly. ATSG specifies holding each position for 5 seconds.
- Monitor CVT fluid temperature on the scan tool and wait until it is in the 35°C to 45°C window.
- With the engine idling and the vehicle safely raised and level, remove the drain plug and observe the overflow behaviour.
What you should see
- A correct level will typically produce a controlled flow that reduces to a drip as the level stabilises through the overflow tube. ATSG describes confirming that fluid drains from the overflow tube, then tightening once flow slows.
If there is no fluid flow at the correct temperature, the transmission may be underfilled and requires additional fluid before rechecking.
Torque note
ATSG lists tightening the drain plug to 34.3 Nm on the JF015E procedure shown. Always verify the exact torque for the specific model, but this value is a useful reference point for this transmission family.
How to Change the CVT Transmission Fluid (Drain and Refill)
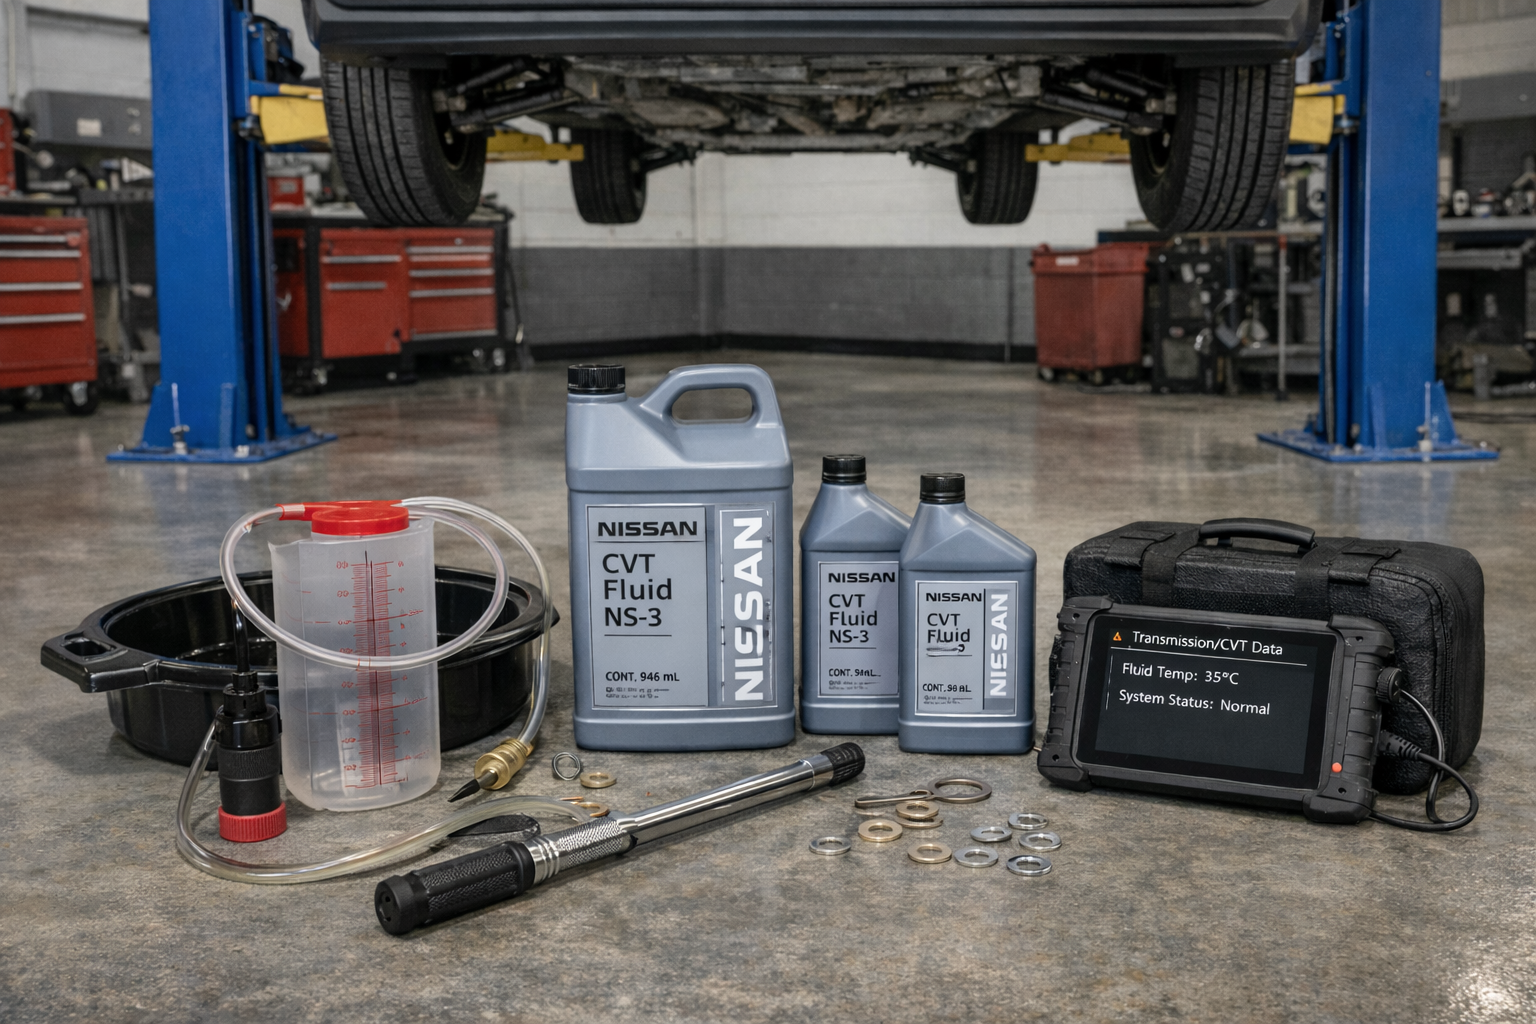
Tools and supplies
- Correct CVT fluid (confirmed for the vehicle)
- New drain plug washer or gasket
- Drain tray and measuring jug
- Socket set and Allen key for the overflow tube (where fitted)
- Torque wrench
- Fluid pump or charging adapter
- Scan tool that can read CVT fluid temperature
ATSG’s JF015E procedure references using a scan tool to monitor “Fluid Temp” and a charging pipe tool, and confirms the level check temperature range.
Step 1: Safety first
- Work on a level surface, use wheel chocks, and use rated axle stands, never rely on a jack alone
- Wear eye protection, CVT fluid can drip from the drain hole area
Capture all used fluid in a sealed container and dispose of it responsibly through oil recycling programmes (Repco and Supercheap Auto participate in NZ oil recycling schemes).

Step 2: Warm the transmission fluid
Bring the vehicle to operating temperature with a short drive. Warm fluid drains more effectively.
- With the vehicle level and safely supported, remove the drain plug.
- For JF015E designs with an overflow tube inside the drain, remove the overflow tube as well to ensure the pan drains more completely (ATSG specifies removing the drain plug and removing the overflow tube using an Allen tool).
- Let the fluid drain fully.
Measure how much drains out.
Optional: pan removal and inspection
If you remove the pan:
- Clean magnets
- Inspect for debris
- Replace the pan gasket if required
A light paste on magnets can be normal. Larger metal pieces are not.

Step 4: Refit components and begin refilling
- Refit the overflow tube where applicable, then refit the drain plug with a new washer or gasket
- Refill using the correct fill method for that vehicle (fill plug, service port, or approved charging adapter)
ATSG’s JF015E document includes a structured fill routine using a charging pipe and staged refilling.
Important: Do not overfill. The final level is set by temperature, and the overflow method

After service: reset CVT fluid deterioration (where applicable)
Some Nissan applications track CVT fluid deterioration and require a reset using a scan tool function. ATSG’s JF015E document references a scan tool path to confirm and erase CVT fluid deterioration data after service.

Service interval
For JF015E-equipped vehicles in NZ conditions, a practical interval is often 40,000 to 60,000 km, with earlier servicing for heavy stop-start driving, hills, towing, or high heat conditions. (Always defer to the manufacturer’s schedule if it specifies shorter intervals.)
Common mistakes to avoid
- Using the wrong CVT fluid spec (NS-2 vs NS-3 mismatch, or non-CVT fluid)
- Setting fluid level without checking CVT fluid temperature
- Not keeping the vehicle level during the level set
- Leaving old drain plug washers in place, ATSG notes replacing the drain plug gasket at the final stage
- Poor cleanliness, ATSG notes using shop paper and avoiding shop cloth for contamination control
Final advice
The JF015E can be reliable when serviced correctly, but it is unforgiving of incorrect fluid type, incorrect level, or contamination. If you do not have a scan tool to monitor CVT fluid temperature and you cannot safely level the vehicle, it is safer to have the service completed by a workshop experienced with CVTs.
- By
- CVT Team
Share this post